Sew Karen-ly Created...

If you have arrived here via a link (such as to a tutorial) click on "Sew Karen-ly Created" to return to the latest blog post. I invite you to my website to see a gallery of quilts and patterns available for purchase.
Comments are always appreciated, simply click the word "comments" at the end of each post to leave your message. Thanks for stopping by!
Showing posts with label New York Roundabout. Show all posts

Friday, 25 May 2018

Mat Inspiration

This optical illusion quilt, designed by Ukrainian quilter Mezhibovskaya Valery Vadimovna, aka lerusisik, has garnered lots of attention, both here and where it currently hangs at Mrs Pugsley's Emporium.
One of the folks intrigued by this quilt entitled "Through The Lens"  is rug hooker Kate Seely from Ontario.  Kate and I enjoyed a conversation on the mechanics of drawing out the design, and she very quickly produced this mat.  Isn't it wonderful?
Her colourful version replaces stark black with a dark green, and uses multi-coloured centres for the blocks.  Believe it or not, the dark green was from a wool kilt which she washed, felted, and then cut into strips.  I don't believe I could ever bring myself to cut up a kilt!!
I was very surprised to get these pictures so soon after she contacted me, but she had an intense five day hooking marathon and went to it.  Kate will eventually add border rows and promises to share pictures of the completed piece.  I think it looks fabulous!
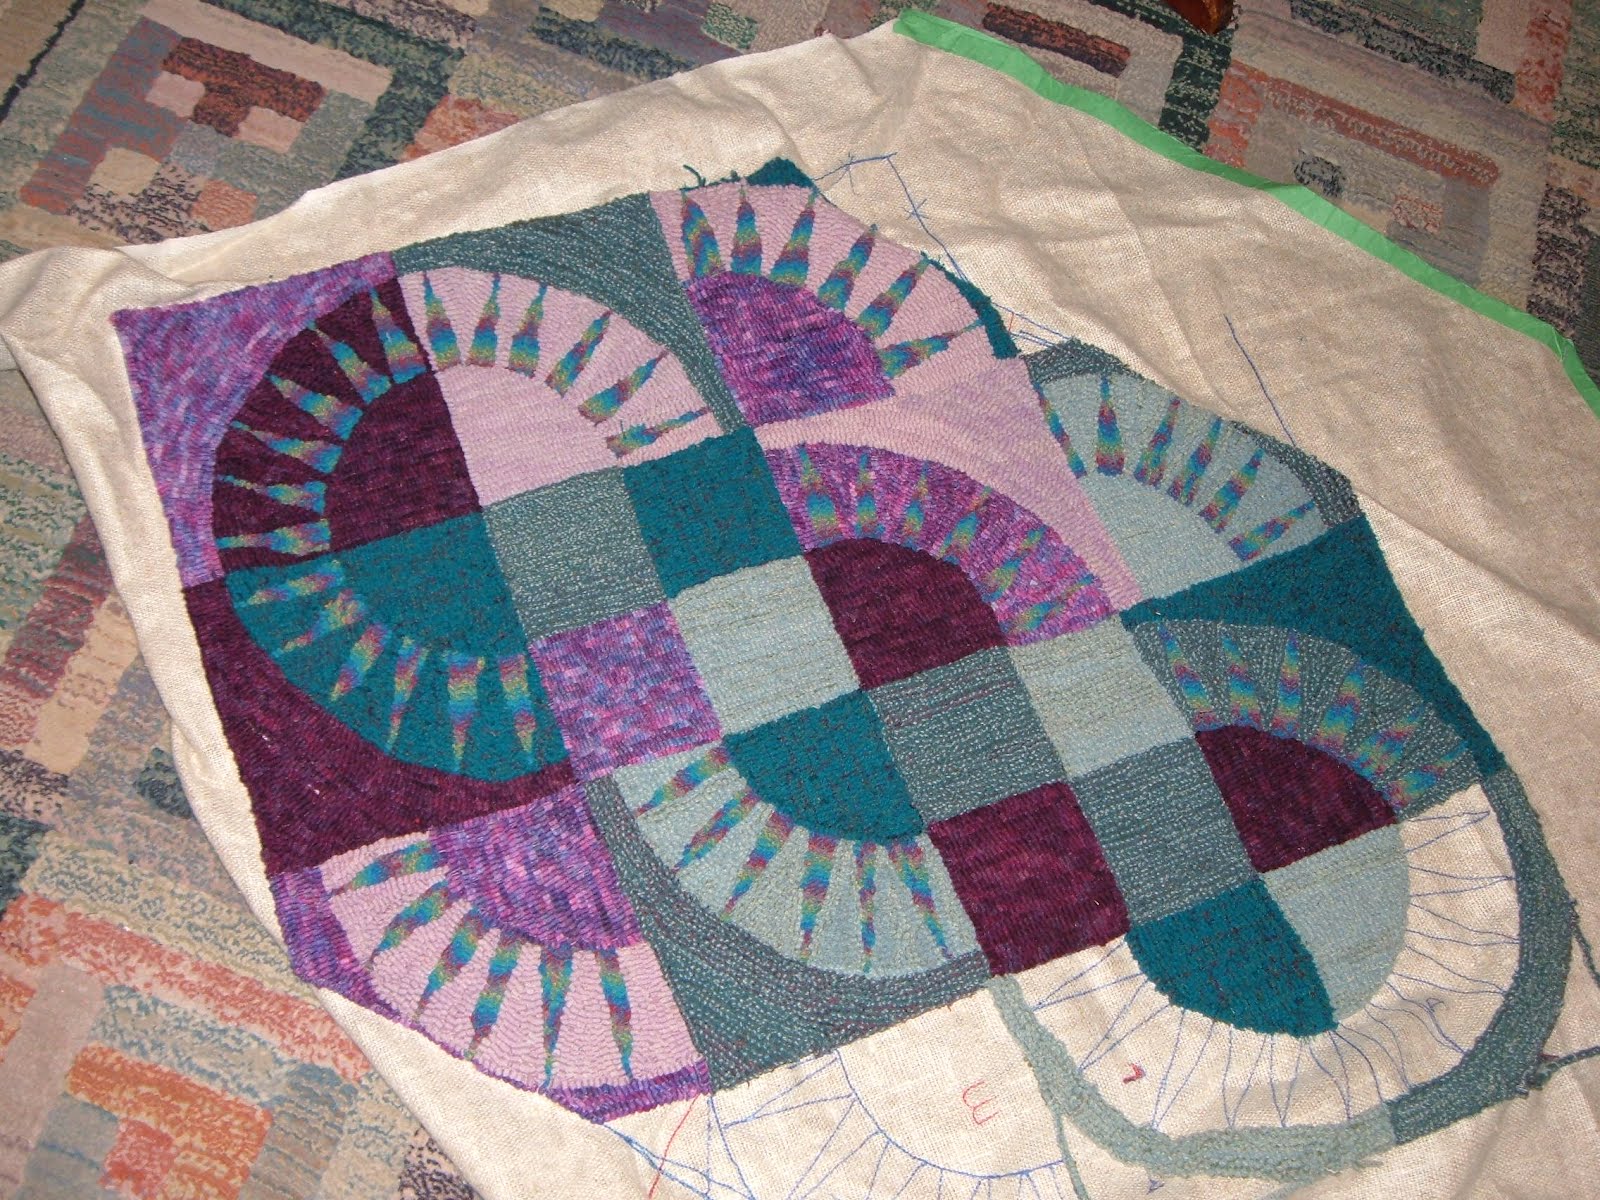
This is not the first time Kate and I have connected over mats and quilts.  A few years back, she wrote for permission to hook my New York Roundabout:
She amassed a palette of wool in similar colours...
..and sketched her design on burlap.


How awesome is this?!
Really love your work, Kate, and so appreciate you sharing pictures.  Can't wait to see your optical illusion all finished!
K8 the Gr8 :)

Thursday, 17 September 2015

Myrna's New York Roundabout Again

I love seeing my patterns done in different colours and prints.  Have a look at this beauty from Myrna Allison of British Columbia:
Light and dark purple, highlighted by a soft green, makes for a very pretty combination.  Myrna gifted this to some very happy friends to be used as a table topper.  Thanks for sharing, Myrna!
You can find the pattern for Roundabout Again here.

Sunday, 30 August 2015

New York Roundabout Again

I've been getting a lot of enquiries about New York Roundabout Again - from all over the world - and figured it must have been posted online somewhere, as often happens.  I had no idea where...and then spotted this ad for a sale at Craftsy.
In the lower right hand corner is New York Roundabout Again made by Jeannine Damstetter of MA. The pattern is not available on Craftsy, nor is it part of a class, but Jeannine took a feather quilting class through Craftsy and used her new skills on her Roundabout quilt. It turned out beautifully and has gotten a lot of well-deserved attention.
 You can find the pattern for New York Roundabout Again on my website.

Thursday, 25 April 2013

Cleverly Roundabout

Way back in October 2011, Kate Seely from Ontario, Canada contacted me to ask permission to translate one of my quilt designs into a hooked mat.   This is not such an unusual venture, as our grandmothers often traced traditional squares and triangles into geometric patterns onto burlap to hook with strips of wool. Kate however was proposing to do a more modern design, one with curves and spikes:  New York Roundabout.
Here's her traced design.  I bet that was no small thing Kate, to draw those curves smoothly.  You did an awesome job.
A couple of months later, she sent us an update on her progress.
What an unexpected surprise to open my mail yesterday and find pictures of her completed rug.  Wow!  I am really taken with the way she filled in the sides, the space between the arcs.  I will remember that for a future quilt.  It gives a great shape to the finished piece.

Kate writes: "It’s going on the floor in front of the fireplace. It’s 44” from tip to tip and 25.5” across – just the right size."


Look at her label - how sweet is this?!
Take a well-deserved bow, Kate.  If you ever tire of it, I'll send you my address;  we have hardwood floors and love hand hooked mats!  Honestly though...I think you need to make the quilt to match...
Please leave a comment and a bit of applause for Kate, she has worked cleverly, creatively and very diligently on this masterpiece.

Wednesday, 6 March 2013

The Mailman Came...

...and left this big envelope:
Could it be...?!?
It was like opening my acceptance letter from university a million years ago.  I held my breath, and then I saw that magic word:  CONTESTANT!!
 My Roundabout Again has been juried into the 2013 AQS Paducah Show in April!!!
Ecstatic is not a large enough word to describe how I am feeling. Apologies to those friends who got awakened with a giddy phone call (well, you should have been up any way by then!) or received one from my almost-dead-constantly-beeping cell phone...(and I can't imagine what my husband's secretary thought was happening!)
You can see pictures of the full quilt here.  The show runs April 24-27 in Paducah, Kentucky.  I am off to charge my phone, I think I've got a few more calls to make *-)
Edit:  You can see the entire list of semi-finalists here

Tuesday, 15 January 2013

How To Sew A NYB Block

So often I hear folks say that they would never be able to sew a curved seam such as in a New York Beauty block, and are too intimidated by the thought to even try.  In reality, these blocks are not a bit difficult as long as you can sew a good, consistent 1/4" seam - as in straight patchwork.  I took some pictures of the process for Marg  a couple of weeks ago and thought that I would retake them and tidy them up a bit for posting here when time allowed.  (ha!) Since there are no more hours in the day in 2013 than there were in 2012, I have decided to post these and ask you to forgive the crooked shots.  

The block below is the same one used in Roundabout Again.  I have my regular 1/4" piecing foot on my sewing machine.  In the picture below, the space inside the green tape measures 9-1/2”, the unfinished size of the block.  You can see that the pieced foundation arch reaches to the 8” mark on the mat.  Since this arch is foundation pieced, you know that it is the exact size it should be;  use it as a guide to line up  the edges of subsequent block sections.  After you have stitched the spikes and carefully removed the foundation paper, stay stitch 1/8” from both curved edges.  No doubt you remember stay-stitching from Home Economics class;  it will not show in your finished work but it helps keep the curved edge smooth in the sewn seam.  Don't fuss over sewing a perfectly straight line, just make sure it is within the 1/4" seam allowance.
Mark the centre point on the bottom edge of the spikes, and mark the centre point of the quarter centre circle.  (I fold it in half and either put in a pin or make a mark with the iron)
Match these centre points and pin.
Place a pin at each end.
Now...If you look closely along the right hand side of the block, you can see where the centre quarter circle is pulling in.  This is usually where the problem lies in having your block come out wonky..
To keep your block true along the edges, pin down both sides at the end of the piece you are adding.  I flipped the patchwork over in the picture below so you can see that I am pinning down along the edge of the pieced arch unit.  You will not be sewing along this edge, the pin just keeps the fabric from pulling in as you stitch along the top curved edge.  You will remove the side pins as soon as your curved seam is sewn.  Make sure you pin both edges.
When it is pinned, it will look like this (below).   The blue headed pins are those holding the fabric to the edge;  again you are not sewing that edge, just the top curved edge where the red-headed pins are.
When I am ready to sew, I flip the piece over to the other side.  Even though we were told in Home Ec class to put the fullest side on the bottom so the feed dogs could ease it in, flipping it over to sew has 2 advantages:  the fullness is now on the top, so you can see if you are stitching any tucks or pleats under your needle, and also you can see the seam where the spike ends, so you know that you should not be stitching past that area for your perfect points.
I pressed the seam towards the centre circle, but would alternate the direction I pressed in the adjoining block  You can see how straight the edges are – without trimming.
I add the outside arch in the same manner – pinning first at the end of the stitching line, and then along the side of the piece I am adding. (see the white pin along the right bottom side of the red fabric?  That holds the edge of the arch true and straight while you stitch along the top curved edge.  
If you have “needle down” on your machine, it’s nice to enable that function;  stitch up to the pins and remove them as you get to them.  Needle down helps keep the fabric from shifting.  Again notice that I am stitching with the fullest piece on top.
I press this band away from the spikes as there is less bulk.  Despite the rather crooked picture, you can see that the edges of this block have stayed nice and straight and it has come out to exactly 9-1/2”.  (I hate trimming!) For me, the trick is all in that side pin.  For the blocks which call for the background section, I add it exactly the same way.
Now...was that so hard?! :)

Monday, 29 October 2012

Roundabout Again...and Again!

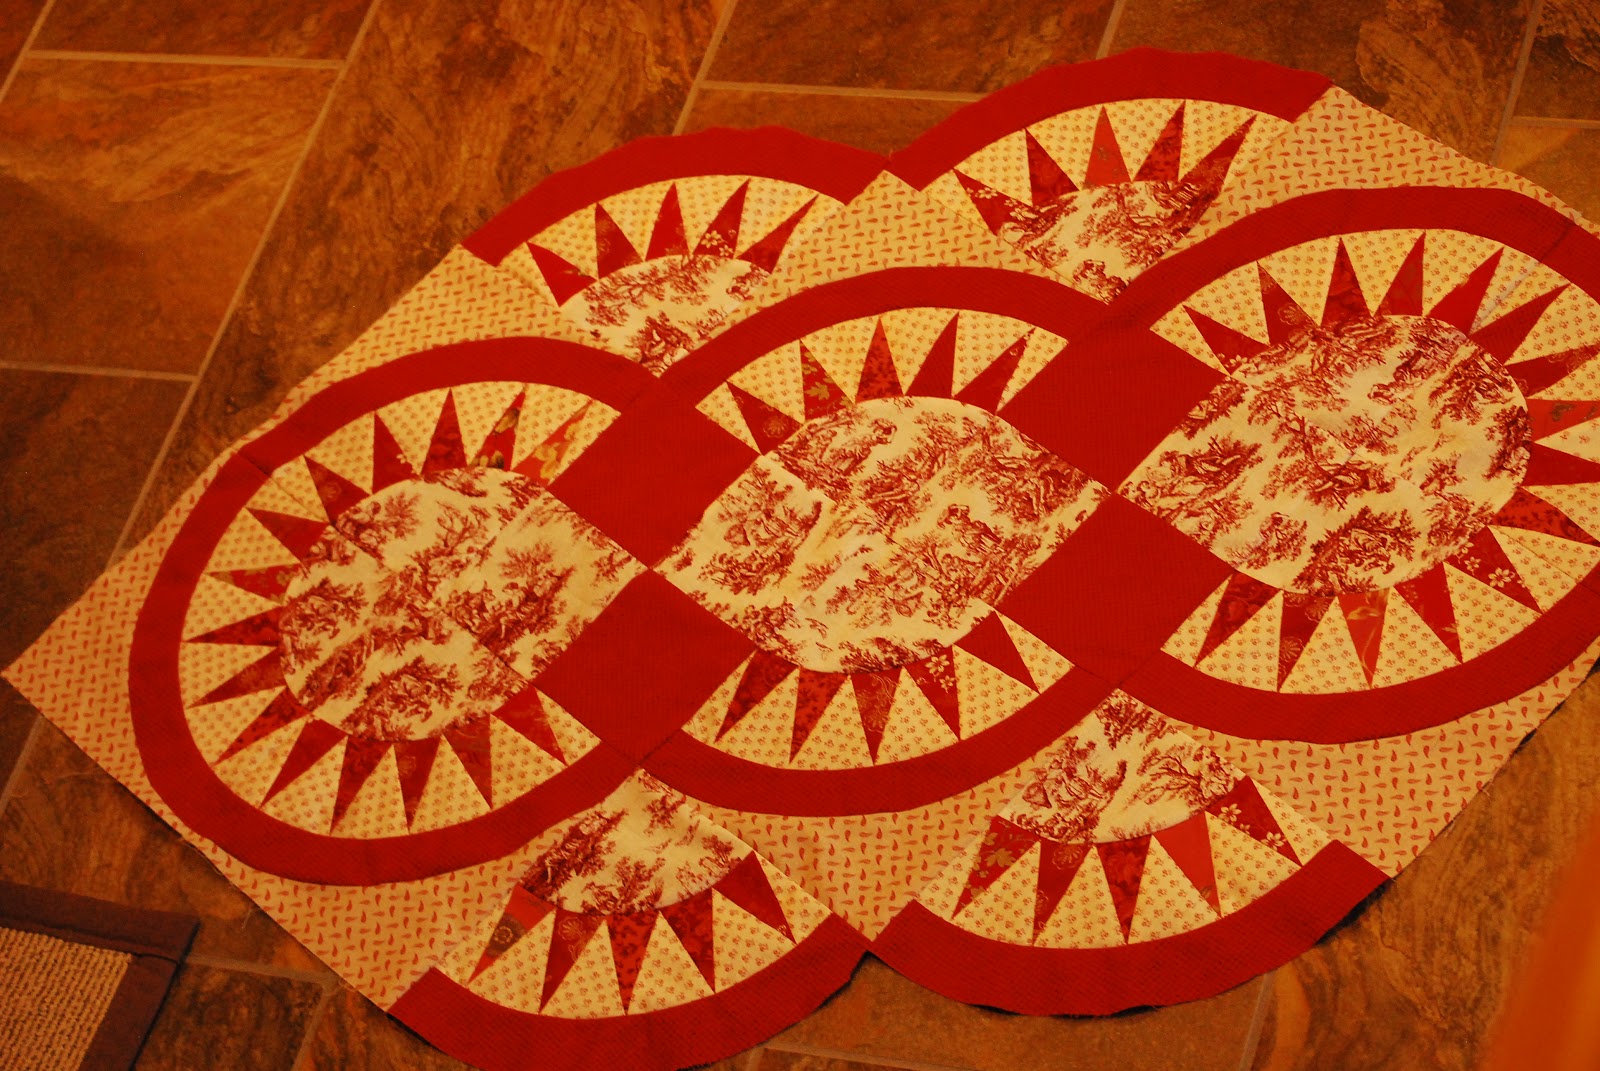
Here's another top from the workshop finished up and ready to quilt!  This New York Roundabout Again was made by Colleen Gander who travelled with her friend Delia from Ontario to attend my workshop at Fibre Arts Festival.  Colleen hadn't planned to send a photo until she had this beauty all quilted, but I coerced her into sharing now. (And no mistake, Colleen - we will want to see it again when it's quilted!) She shot it early this morning and the colours are a bit skewed.
I took some of the yellow out in Photoshop, but it still isn't quite right.  Colleen used a delicate red and white toile for the centres.
Thanks, Colleen;  I never met a red quilt I didn't love and this one is no exception.  Looking forward to seeing it quilted!
Kindly leave a note for Colleen on her beautiful work by clicking the word "comments" below.  You do not need any sort of account to comment, simply click "anonymous" at the bottom of the option menu.

Friday, 26 October 2012

First Finish - And It's A Beauty!

No surprise, it's Joan, and look at this - she's even got it all quilted and bound.  (Look at those feathers! )
Skip on over to Joan's blog Ouvrages d'une Acadienne to see a picture of the entire quilt.  It's BEAUTIFUL, Joan!

Saturday, 20 October 2012

First Finish?

It's sort of, kind of, the first finish from the workshop...(the qualifiers are because it isn't really the whole quilt and the maker wasn't really in the class!)  However, it is the New York Beauty block from Roundabout Again, and Beth did pop into the class for a few minutes to pick up the pattern and see what was going on.  That counts.
Beth Munroe is a beginner quilter but has been a sewist for a good many years. (I almost termed her a "sewer" but that term written always makes me chuckle as I think of underground waste pipes...I don't want to call anyone a seew-er) Beth watched a quick paper-piecing tutorial at Fibre Festival Headquarters last week by Phyllis Cameron and decided she was ready to tackle a block.  Built-in decorative machine stitches were used to quilt the block.  Beth followed the directions in the pattern to make continuous bias binding which transformed her block into a potholder.  Now Beth is feeling confident and ready to start the quilt!

Thursday, 18 October 2012

A Little Inspiration

Last week during the demonstration at dayle's, I finished up the machine quilting on this Christmas version of Roundabout Again.  The angle is a little odd in this picture as it is spread out on the dining room table.  I will take it full on when I get a hanging sleeve on the back.


I put a little flicker of gold metallic thread in each point and did a continuous curve in the spaces between.   The outer ring was quilted in unmarked, free hand feathers using the curved edge of the archband as the spine of the feather.
I used this piece in the workshop to demonstrate the application of binding an inside corner, and also my really easy method of joining the ends of the binding in a diagonal seam. 
New York Roundabout Again pattern #112 is available here.

Monday, 15 October 2012

Roundabout Again Workshop

Here are some pictures of my Saturday workshop, part of the Nova Scotia Fibre Arts Festival.
Many of the quilters shown here have been coming for the past several years, making this an annual destination.  Most average about a 6 hour car ride, with the ones from Ontario logging substantially more hours.
Tina and Sheila have both attended for several years.
This year, 7 members of La Guilde Acadienne de Clare were in attendance.  Here you see Joan and Elaine busily working away.  There are more pictures of the workshop on Joan's blog.
Mary and I have corresponded for many years so it was wonderful to finally meet up.
We welcomed a few new faces as well;  here's Helen from Havre Boucher, N.S.  In the background are Elaine, Joan and Simone.
Brenda from Truro is working on making continuous bias binding to finish her project.

Gaile, Tina, Sheila, Jean and Amanda showing off their blocks
(that one in the middle always has to be different *-)
The colours and fabrics chosen by the participants were all so varied, I can't wait to see the finished projects.  I've had emails from a couple of folks who hurried home to finish their blocks so hopefully it won't be long before we see some results. It was an absolutely wonderful day.  I am always humbled by how generous quilters are in sharing their talents.  Mark your calendars, and we'll do it all again next year: October 15 - 19, 2013.