Yesterday my friend Cheryl (aka Grandma Coco's Designs) posted these incredibly beautiful, embroidered masks which she makes as a fundraiser for the Lyndhurst Feral Cat Project. Her two-tone masks in particular spoke to me, as I had not considered fancy piecing as mask covers. When she first shared her progress photos with me a week or so ago, I jokingly told her I should do a New York Beauty one, and she of course said, "great idea - I think you should do it!" That sounded a bit like a challenge...or a dare..so I decided to give it a go.
Where to start? In drafting the pattern, I started with the thinking that 4 New York Beauty blocks set together form a circle; the rounded edge of that quarter circle centre section could form the curve up the nose. I began by drawing a circle and worked back from there.
Normally, I draw my patterns in EQ8 but I figured flying blind would mean lots of erasing, and easier to do that by hand. It came out looking a bit like a basketball at first...
Once I had the shape, my easy method for adding seam allowances on curved edges is to unthread the machine and stitch with my 1/4" foot. I did that all the way around my template.
Using my curved ruler, I marked equal divisions on the outer ring and staggered divisions on the inner ring. With a ruler, I connected the dots to make the NYB spikes.
Once I had my pattern, I made 3 copies to cut up into a template and a foundation.
With only three spikes, the foundation piecing was quick. I reached in and pulled Island Batik scraps from a basket as I went, paying no attention to colour at all.
After the foundations were trimmed, I added the curved bottom section. I used my pieced sections as a pattern to cut two pieces of lining from batik, and also one layer of nonwoven interfacing. In total my mask has 3 layers, two with no needle punctures.
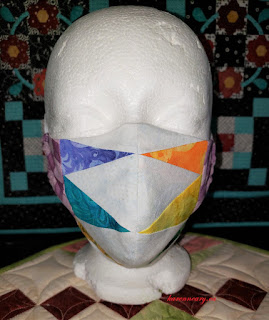
I added a casing to each end to insert the elastic, which made it easy to adjust the length for my mask model. I call her Louise. Her ears are not in the same place as mine. :)
Granted, you don't really get the effect of a NYB block; it's more of a diamond pattern across the centre which stands out.
It's really not a bad fit, for either me or Louise, and perhaps a good jumping off point to try again. Having spent most of my summer with monotonous mask sewing, it made for a nice change of pace.
The nay-sayers will be quick to point out that there are perforations in the mask because of the seams, and thus not safe to wear. I will say again that the pieced layer is simply a cover, and that there are two layers underneath this, one of which is non-woven. It was a fun project to challenge my brain. Thank you, Cheryl, for your continued inspiration! :)


