...is busy! This week has been off in a myriad of directions, with w-a-a-a-a-y too much going on to fit everything in properly. On Tuesday evening, I "attended" the Awards Presentation at Paducah through the online webcast and it was an awesome experience. It was really just like being at the live show and I enjoyed it so much. If time permits, I hope to watch more webcasts this week; you can subscribe to them here for a modest fee.
Farrago did not win anything, but that doesn't take a tad away from my pleasure at having it included as part of this show. I'm thrilled to pieces about it all. Despite having to rearrange for flooding at the last minute, the organizers at the AQS Paducah Quilt Show are doing a spectacular job. The list of winners is posted here. It's wonderful to see a Canadian name among the big winners, Kathy Wylie of Ontario. Congrats, Kathy! If I am reading the reports correctly, I believe my Farrago has been moved to The First Baptist Church of Paducah in the Wall Quilts Exhibit.
And speaking of churches...hubby and I and the girls (and by this I mean the bees) have been invited to be part of Earth Expo at Trinity St. Stephens United Church in Amherst on Saturday, April 30.
If things go as planned (do they ever?!) we will have a display including honey and beeswax, a Power Point show on beekeeping AND a glass observation hive of live bees. We will go out in the wee small hours Saturday morning to try to find a frame which includes a queen and bring her along to show. There are all kinds of "green" displays scheduled as part of this expo, so if you are in the Amherst, N.S. area on Saturday between 1-4 pm, please drop by.
If you happen to be looking for a quilt show on the weekend, check out The Fredericton Quilter's Guild "Thoughts Of Spring" Show. I am sorry to be missing this show as there are so many talented quilters in the Fredericton area. I do look forward to seeing lots of pictures on the Guild blog afterwards.
On Monday, Tempus Fugit will be shipped off to Quilt Canada. I need yet to affix the hanging sleeve on the back but other than that it's good to go. With so much else going on, I have nightmares I will forget to post the parcel. Also next week is the release on May 2 of Volume 3 of The Quiltmaker's 100 Blocks From Today's Top Designers. As I have a block selected to be in this issue, I will be part of the big blog tour which will be taking place. There is a ginormous prize package that tourists can win at the end of the week so make sure you stop back here next week for details on how to enter.
Thursday 28 April 2011
Tuesday 26 April 2011
The Show Must Go On
Oh my...as if organizing a show the magnitude of AQS Paducah isn't exhausting enough, now there's Mother Nature to deal with as well. Kudos to the organizers who are managing to pull things together.
Wednesday 20 April 2011
Building A Good Foundation
Since a good many of my patterns are written for foundation piecing, I am often asked what paper I use and how I transfer the lines from the master included in the pattern. As with every thing else in quilting, there are many ways to answer the question but here's one very simple and cost effective method I like. Purchase a Doodle Pad of 9" x 12" newsprint in the kid's section of the $ store. Walmart carries these pads as well but in a larger 12" x 18" format. Sometimes there is less waste with this larger sheet as you can fit 2 or 3 foundations on the page.
Tear out the number of sheets you need for your pattern.
Lay your master pattern on top of the newsprint to see how it will fit on the page.
Roughly cut around your foundation and Scotch tape the edges beyond the lines in several places. Staple the top edges of your newsprint sheets together, making sure you don't have any staples underneath the stitching lines on the master.
Remove the thread from your machine and put in an old dull needle. Stitch on all the black lines, including the outer seam allowance.
Carefully remove your master foundation.
Voila! You now have a stack of foundations with the stitching lines all transferred.
With a marker, number and label your sections with the intended fabric colours. I've done up to 8 at a time using this method. One big advantage is that the lines are already "scored" making the paper removal even easier once your fabrics are added.
If you are really frugal (yes...like me) you can use this method to stitch through pages of old telephone books, saving you the cost of the Doodle Pad. Just be aware that it is a bit harder to see your design through the print.
Number and label as before and you're good to go!
Tear out the number of sheets you need for your pattern.
Lay your master pattern on top of the newsprint to see how it will fit on the page.
Roughly cut around your foundation and Scotch tape the edges beyond the lines in several places. Staple the top edges of your newsprint sheets together, making sure you don't have any staples underneath the stitching lines on the master.
Remove the thread from your machine and put in an old dull needle. Stitch on all the black lines, including the outer seam allowance.
Carefully remove your master foundation.
Voila! You now have a stack of foundations with the stitching lines all transferred.
With a marker, number and label your sections with the intended fabric colours. I've done up to 8 at a time using this method. One big advantage is that the lines are already "scored" making the paper removal even easier once your fabrics are added.
If you are really frugal (yes...like me) you can use this method to stitch through pages of old telephone books, saving you the cost of the Doodle Pad. Just be aware that it is a bit harder to see your design through the print.
Number and label as before and you're good to go!
Monday 18 April 2011
Quilting/Bees
Although the week ahead promises to be rainy and cold, Saturday the bees enjoyed a bit of sunshine. We were quite surprised to see how much pollen they were able to collect as there were no visible blossoms we could spot. See the little yellow sacs on their legs? That's how they carry the pollen they've collected. My spring goal is to clean out fabric and the odd flimsy (i.e. pieced, but as yet unquilted, tops) which have been piling up. I found a set of Quick Trip Around The World Placemats and am free motion quilting those in circles.
While deciding how to quilt the oriental New York Beauty blocks, I am sewing red and blue scraps in 8" string blocks. They work up so quickly.
Hubby and I have been asked to do a bee display for Earth Day and it's been fun getting posters made and sorting apiary pictures into a Power Point show. We've never done a display together before and we are looking forward to this. Will post details as we move closer to the day. In the meantime, it's more string blocks until the red pile is depleted... (after which I get to buy more reds, because I can't be with my favourite colour!)
Friday 15 April 2011
A Maritime Maritime Beauty
The title is not a typo; this is a Maritime Beauty made by a fellow Maritimer, Lynn. It's been awhile in the making, but worth the wait. Don't you love the colourful batiks she has chosen? It`s beautiful.To make your own, check at your local quilt shop for the pattern, or order it from the checkout on my website. Thanks for sharing your lovely work, Lynn. (We can see your toes in that picture *-)
Thursday 14 April 2011
There Must Be 50 Ways To...
make your HSTs (but probably Paul Simon is not going to sing about them.)
Jennifer has given permission to post this link to her tutorial for a clever alternate way to make HSTs. Try it out, and see what you think. The measurements she gives will create a 4" (finished) block. Note that the link posted above is directly to this tutorial; to go to her latest post, click on the title Bronze Wombat at the top of the picture.
For the record, I do not know what a Bronze Wombat is; perhaps we should all ask Jennifer?
Wednesday 13 April 2011
New York Roundabout Progress Report
Last week, we saw the beginning of a New York Roundabout quilt by Grace from Ontario. Grace now has the top completed and is in the process of deciding how to tackle the quilting. It looks like it has gone together rather spectacularly. Grace writes that she loves the points. I expect this is the beginning of a long and happy relationship for her with New York Beauty blocks. Be warned, Grace: they are totally addictive!
Monday 11 April 2011
IQF Cincinnati Pictures
I am so pleased to receive these pictures from fellow quilter Katie who was lucky enough to visit the International Quilt Festival in Cincinnati over the weekend. She made a special point to visit the "O Canada" exhibit to take pictures for me. I am grateful she made time and effort to do this. Katie writes that With Glowing Hearts was at the very front of the O Canada exhibit so she had no trouble finding it.
Look - here it is!
I like that Katie sent a long a couple of shots of herself; she's obviously having a great time. Hope you don't mind me posting the pictures here, Katie!
Katie also has a blog and has put together a slide show of lots of pictures from the Festival. Pop over and have a look.
Saturday 9 April 2011
International Quilt Festival Cincinnati
Well...the show started yesterday at the Duke Energy Convention Center and I'm not there, but cyber-friend Katie has generously offered to take lots of pictures on her visit and send them along. In the meantime, thanks to technology we can visit virtually. If you click this link you can watch a really interesting webcast taken at the show. It sounds like an amazing experience.
On the left side of the screen there is a link to Special Exhibits; if you click this and choose O Canada 2011 from the top, there are 12 quilts from this exhibit displayed - and mine is one of them!! :)
Friday 8 April 2011
Patchwork Tidy Tray©
Here's a fun little project just in time for a special Easter gift. This Patchwork Tidy Tray © does double duty as a shallow Easter basket. The addition of a quilt block on the inside bottom is a happy surprise. This is a great item for traveling as it will lay flat in the suitcase and can be easily tied to form a nightstand tray for small items like earrings that may otherwise get left behind.
4, 2-1/2” squares green (generous measure -see note below*)
4, 2-1/2” squares ecru (generous measure) *
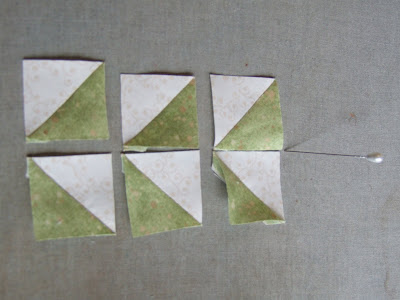
*To make the Grandma’s Favourite block, I used a quick method for sewing HST (Half Square Triangles). I happen to like this lazy method as I don’t have to trim (directions follow). You can use your own preferred method for making the HST. To cut a generous 2-1/2” square, you want to be just a thread over 2-1/2”. If you are used to cutting on the inside of your ruler line, cut on the outside. This will ensure you don’t have to trim your block. If you are unsure, cut your squares 2-5/8” and trim your finished HST to measure 1-1/2” UF (Unfinished). Place ecru 2-1/2” squares on top of green 2-1/2” squares. Sew together completely around all 4 sides ¼” in from edge. Cut diagonally corner to corner.
Press your squares open to yield 16 HST which measure 1-1/2” (UF). Layout as shown, alternating HST with plain squares, and sew together in rows. Press seam allowance in alternating directions in each row. Join rows. Press seam allowances for the rows all in same direction. Your block should measure now 5-1/2” (UF) To Add Mitred Border: Mark and match the centre of your patchwork to the centre of one border strip. Pin in place. Sew, beginning and ending stitching ¼” from each end; leave the ends hanging loose. Repeat for all 4 borders.
The block I chose is called Grandma’s Favourite and directions follow for this block. You may choose a different 5” block for your tray bottom, or even just a pretty print.
Finished Size: 5” square x 2” high Finished Block Size: 5”
Please read through entire directions before beginning project. ¼” seam allowance used throughout.
Materials Required:4, 2-1/2” squares ecru (generous measure) *
4, 1-1/2”squares pink
4, 1-1/2” squares ecru 1, 1-1/2” square yellow
4 pieces ecru 5” x 11-1/2” (for sides of tray)
5” square heavy weight fusible interfacing (like Décor Bond)
9” square fusible batting
15” square backing fabric (this is what shows as the outside of your basket)
48”, ¼” wide satin ribbon
Thread to match48”, ¼” wide satin ribbon
Easter grass, chocolate eggs and Lindt Chocolate Bunny (optional…but tasty )
Press your squares open to yield 16 HST which measure 1-1/2” (UF). Layout as shown, alternating HST with plain squares, and sew together in rows. Press seam allowance in alternating directions in each row. Join rows. Press seam allowances for the rows all in same direction. Your block should measure now 5-1/2” (UF) To Add Mitred Border: Mark and match the centre of your patchwork to the centre of one border strip. Pin in place. Sew, beginning and ending stitching ¼” from each end; leave the ends hanging loose. Repeat for all 4 borders.
Press seam allowances towards borders. Working on one corner at a time, lay one border strip on top of another.Fold under the end of the top strip on a 45° angle. Check that the fold is lined up with the corner of the block (blue pin in photo). To ensure the corner stays true, line up the excess ends of the meeting border strips to the right of the corner (red pins in photo)Verify your angle with the 45° line on your ruler.When you are satisfied with the angle, bring the hot iron down directly on top of your mitre and press.Pin the borders together to the right of the seam.Fold quilt back so that the top borders line up. Pin along your pressed line.Stitch along this pressed line beginning at the inside corner where the stitching ended when adding the border strip to the patchwork.Trim seam allowance to ¼”. Press seam open. Sew remaining 3 corners in the same way.
Fuse 5” square of Décor Bond (or any heavy weight interfacing) to the back of patchwork block to give a firm bottom to the tray.Cut your ribbon into 8, 6" lengths and stitch to your backing fabric 1-3/4” from each corner.
Iron fusible batting to backing square. Right sides together, stitch this square to the patchwork top leaving an opening along one edge for turning. Turn right side out; poke out corners (a chopstick works well for this). Press lightly. Pin open edges together and topstitch around perimeter. Using a walking foot, quilt around the patchwork square and though each mitred corner seam. With patchwork side facing up, tie ribbons in a bow in each corner. Isn't it cute?
Enjoy!
Enjoy!
Subscribe to:
Posts (Atom)