Sew Karen-ly Created...

If you have arrived here via a link (such as to a tutorial) click on "Sew Karen-ly Created" to return to the latest blog post. I invite you to my website to see a gallery of quilts and patterns available for purchase.
Comments are always appreciated, simply click the word "comments" at the end of each post to leave your message. Thanks for stopping by!

Monday 29 August 2011

Yellow Ohio Stars - Finished

It was great to receive so many comments and emails with helpful quilting suggestions for this Ohio Star quilt. As you can see, it's now finished. Sincere thanks for the input. Linda H. of Stitch Lines wrote to suggest a simple "piano key" border with stars in the corners and as soon as I read the words, I could see it on the quilt. Perfect! Linda teaches machine quilting and knows a thing or two about what works. I really appreciate your help, Linda!
My quandary with the border quilting was that I felt the centre was busy enough with the feathered wreaths and yet the density of the quilting needed to match, as otherwise the quilt would have wavy edges. The border is 3" wide, so I printed off some Ohio Stars that size and some a tad smaller from EQ7 to try them out.
I traced them onto Golden Threads paper using a FriXXion marker. You can sew right through this paper and it tears off easily afterwards. If any ink transfers to the thread when stitching, heat will make the FriXXion marks disappear.I used the even feed foot for the channel quilting, and marked the lines 1" apart using a FriXXion pen.
The binding is applied to the front of the quilt by machine, then flipped to the back and hand stitched in place. I work the corner mitres by stitching to within 1/4" of the corner and then sewing off the edge at a 45 degree angle. This diagonal seam keeps the mitres true.
The binding flips back easily against that seam.
The outside edges line up for a perfect mitre every time.
The ends of the binding are joined in a diagonal seam.
Over the years, I've discovered the simplest way to make this join without using any measuring, math, special tools, or gnashing of teeth! It is unbelievably easy to do.
A perfect fit! I will be demonstrating this method in the Free Motion Quilting workshop during Fibre Arts Festival as so many struggle with this join.
The back of the quilt is an extra wide soft flannelette printed with little yellow duckies.
As this quilt is for sale, I added a commercially printed satin label to the back. One end of the label is caught in the binding seam, and the other is hand stitched in place.
It will also have a hang tag featuring fibre content and washing instructions. The quilt measures 40" x 50", which makes it a generous crib size.
If you would like to make your own Ohio Star crib quilt, the pattern appears in the book Canadian Heritage Quilting. This quilt will be part of the show and sale of my work held on the Thursday of Fibre Arts Festival in October...unless of course, I sell it before then(!)

Good Night, Irene

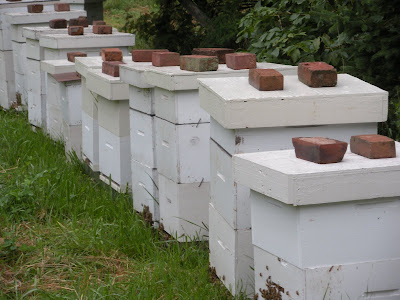
In preparation for the storm, hubby and I were out yesterday taking off honey supers and securing the hives. The bees were a bit agitated, but we don't know if that was from sensing the storm or because we were stealing their hard-earned honey.

By the time we left, the hives were as braced for the wind as they could be. It is still blowing hard here today but the worst of Irene has passed over this part of Nova Scotia.

Friday 26 August 2011

Pacific West Quilt Show

Awhile back, I posted a picture of Joanne Colleaux's version of my Farrago design. She named hers "Underwater Blossoms." Joanne contacted me again several months ago to ask permission to enter the piece in the Pacific West Quilt Show which is taking place this week in Tacoma, Washington. Yesterday I received a note from a very excited Joanne telling me she was off to the Awards Ceremony as her quilt took second place in the Traditional Small Quilts category. Woo Hoo, Joanne!! Joanne's interpretation of the design is stunning, and so very well executed.
The complete list of winners is here. Joanne is from British Columbia, and it makes me proud to see a Canadian quilter in the winner's circle. Joanne has been so generous in sharing her journey to this show that I really feel there is a part of me there. Sincerest congratulations to you, Joanne. I hope you will have pictures to share from the show. (I think I feel another "Woo Hoo" coming on...yup, there it is: Woo Hoo, Joanne!! )

Thursday 25 August 2011

The Quilting Grew Like Topsy

The yellow Ohio Star crib quilt which was supposed to be a quick-finish project has turned into the opposite. Like Circe, those feathered wreaths in the centre alternate blocks kept calling my name so I continued the same motif into the setting triangles. I am stopped now to think on what comes next.
The thinking has taken as long as the actual sewing. I am torn between quilting down the white background spaces around the stars to make them stand out more...or leave them as is just outline quilted. Perhaps all the star needs is a little swirl in the centre. I don't want this piece quilted to death, as it is a baby quilt and should be soft and cuddly. It needs space to pouf. After the stars are thought out, then the thinking turns to the outer border.
I expect with all those feathers in the centre, the border motif will be a no-brainer...and my brain could use a little rest!

Monday 22 August 2011

Yellow Ohio Stars

It rained again today, so Polly and I went through our stack of "flimsies" (i.e. pieced but unquilted tops) and chose one to finish. When working on the book Canadian Heritage Quilting, I had pieced an Ohio Star baby quilt in yellow and white polka dots. I really liked it, but found in test shots that the pattern wasn't showing well in the photographs. I decided to scrap it and start over by adding a sparkly blue with the yellow polka dot, set off with a white sashing. Smiling faces were stitched in some of the star blocks, making this a fun, happy quilt.
But I still like the soft, dreamy look of the original yellow and white version and decided it was time to bring it to life with some quilting. I started with my usual in-the-ditch around all the blocks and borders.
Since this is a very traditional pattern, free motion feathered wreaths worked well in the plain yellow alternate blocks.
Even though they are the same pattern, this quilt and the blue/yellow/white one will have a completely different feel.

Sunday 21 August 2011

Cat Love

Awwwww...
Polly thinks the stuffed cat who lives on the back of our family room couch is the cat's meow (even though it can't...). Polly jumps on the kitty and purrs like crazy as she kneads her little paws into the fur. Then they snuggle in together for a little cat nap. Everyone needs a BFF.

Friday 19 August 2011

Living Waters Stole

The custom designed stole commissioned a few weeks' back is finished and delivered to the recipient.It felt good to see how pleased she was with the results. The stole is made from silk noile with habatai silk and lamé appliques. Holographic, metallic and iridescent threads were used to give a few sparkly highlights to the glass jar, water, and silver bowl. The backing is velveteen which features an embroidered cross stitched in metallic thread. Needless to say, using these specialty threads and fabrics was a challenge.


Monday 15 August 2011

String Theory Realized

The String Theory quilt is all finished.
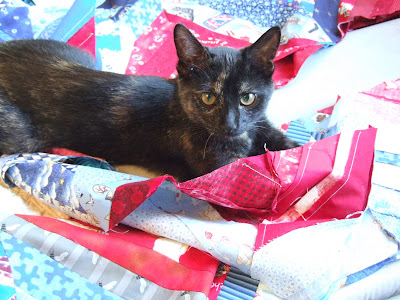
Polly was a big help in checking for errant thread ends which needed to be tied and clipped.
I love sewing string quilts. No two ever look the same, and they are a fabulous (and mindless) way to use scraps. As always, I began with an old phone book as foundation for this project. The lap quilt layout is 6 blocks across by 8 down, so I tore out 48 pages and cut them roughly into 8-3/4" squares. I used fabric strips leftover from my Log Cabin X quilt, as well as some red scraps. Strips were cut into random widths, varying from 1" to 2-1/2". I began with a blue strip right side up diagonally across the centre of the paper. A second blue strip was sewn right sides together with this strip, and a red strip sewn to the opposite side. Sewing a strip to either side of the centre at the same time made the blocks go together quickly. The strips were flipped to to the right side at the same time, and pressed in one operation. Then it was back to the machine to add two more strips and so on until the foundation was covered. Blocks were trimmed to 8-1/2" square, giving a finished block size of 8" and a quilt 48" x 64". Pictures of this process may be seen on a previous post on string placemats.

Polly and I settled on this layout for the blocks:

As this is a dorm quilt intended for a young man headed into a discipline requiring mathematics and physics, it seemed appropriate to use a geometric spiral as a quilt design. Hearts and flowers would not be appropriate here! The square spirals are stitched in a wave pattern, another element familiar to a budding physicist.Oh, oh...Polly spotted another thread end...The date and the recipient's name were free motion quilted in one of the blocks. I used red Wonderfil Konfetti - a 50 wt. cotton thread - for the red blocks and YLI blue variegated Ultrasheen for the blue blocks.After handstitching the binding in place, Polly and I took the quilt outside yesterday to photograph.Polly took on the responsibility to meter the light, and check for any stray catnip mice on the premises. (She's the black blob near the top of this tree.)

No mice were spotted and Polly gave the all-clear, so we proceeded with the pictures. Thanks for all your help, Polly; it only took twice as long with your input :)

At The Speed Of Snail

Sometimes progress is painfully slow but eventually we do get where we are going. I finally decided on a quilting design for the string quilt. The red blocks have free motion round spirals and the blue blocks will have square spirals. (Technically, I am not sure there is such a thing as a "square spiral" but I know what I mean, and I expect you do too.)
Polly watches to make sure I am stitching things correctly. She's a stickler for detail.
The big job of the weekend was getting the hives all moved back to their winter home. Moving bees at any time of the season is tricky but at this stage, with the heavy honey boxes, it is a stress. We feel great relief when it's over. There are 23 hives in all (one is hiding behind another in this picture, in case you are counting.)
Already we have started taking the honey supers off. With our wet summer, the bees have struggled to put away much honey. Despite having about double the number of hives we normally do, honey production will not match last summer's. They still have a few weeks to work so we are hoping for sunshine into the fall.

Friday 12 August 2011

Out and About

We've done some tripping around this summer -when we could find a fine day to do so!- and will share some snapshots. This is Isle Haute, viewed from the back. That strikes me as a funny thing to say - since when does an island have a back? - but it's all about one's perspective of course. This shot of the back is taken from Nova Scotia's Annapolis Valley.
The picture was taken from the lower land mass shown on this Google map, whereas normally here in Cumberland County the island would be viewed from Advocate or Cape Chignecto, the two pointy juts to the top of the island. It has afforded me great amusement every time I think of the phrase "the back of the island." (I guess I don't get out of the sewing room much...)
In Shediac, New Brunswick we found this giant lobster crawling up on the shore. You can see folks were terrorized by this crustacean menace.Dinner at The Green House was lovely.

Another day we did some "antiquing". Guess what we found in this shop?! Two Featherweights! Guess how many were in the shop when we left. TWO! I did not give in to temptation this time...since I already own four. They made me smile when I saw them though, and were certainly the high point of the day for me. I found it interesting that one was placed so it was the first thing you'd see entering the shop, case open, and accessories spread out on display.
One last snapshot, but for this one you will have to use your imagination. I had an email from a childhood friend telling me she was in the Marden's in Presque Isle, Maine, and my Santa's Trip Around The World quilt is on display in their fabric department. That in itself is a nice compliment, but it was very flattering to know that Margaret recognized my design and wrote to tell me. I do appreciate that.
(I wonder how many folks will write to ask where those Featherweights are! :)

Tuesday 9 August 2011

A Maze Of Colour

Last year at the Nova Scotia Fibre Arts Festival, this beautiful quilt by Phyllis Cameron hung front and centre on the stage of Tantramar Theatre for the Official Opening. Needless to say, it got a lot of attention. Phyllis also welcomed visitors into her home to see more of her stunning work.

This year during the 2011 Fibre Arts Festival, Phyllis is offering a class entitled "A Maze Of Colour" to share some of her expertise. Here's what the class will cover:

A Maze Of Colour: This is a full day workshop to be offered on Friday, October 14th.

One of the most intimidating aspects of quilting and other crafts is making colour decisions. It instills in us an insecurity that can take the joy out of our work and limit our creativity. To use colour effectively we need a good grasp of the basics. I agree with those who say that a systematic approach to choosing colours provides the foundation on which to build skills that give confidence to move outside our comfort zone.

During this workshop participants will learn some basic colour concepts and relationships and look at three systematic approaches to choosing colours.

All supplies for the workshop are included in the workshop fee. Participants should bring a pair of scissors and a pen/pencil.

For more information or to register, email or call (902) 661-4400

Saturday 6 August 2011

Stole-n Moments

With the string quilt all basted and ready to quilt, Polly and I stole off to start a stole - a liturgical stole, that is. The kind ministers wear. This is a commissioned piece which means I am going slowly to make sure I stick to the agreed upon sketch. It is being made entirely of silk habutai (except for the silver bowl which is lamé) on a raw silk noile background.
Because it has elements of water, I am drawn to using sparkly threads...but not too many, as we agreed to keep it as plain as possible.
The challenge with designing a stole is the awkward size of the canvas on which to express your vision. It's roughly 5" wide so the shapes are quite contained, and yet you want the piece to read from the back of the church. Tricky indeed. Good thing I have Polly's help on this one.

Friday 5 August 2011

IQF Long Beach Pictures

Once again the long arm of the sisterhood of quilters has reached out and snapped the shutter on several cameras for me. I am grateful that quilters have such generous hearts. Here's a shot of the Convention Centre where the show was held last week.
Look at this carpet in the foyer - I can see this being a beautiful quilt design :)
My blog-friend Marilyn had emailed in advance that she would be working the show as a white-glover and would try to get into the O Canada exhibit to see my quilt if time permitted. When she got her post assignment prior to the show, guess where she had been placed to work? Yup - the O Canada exhibit. Kismet! If you'd like to see pictures from the show, check out Marilyn's and Angie's blogs. Angie even did a separate, special post named in my honour - now how cool is that ? *-)
Thanks to all who sent photos; it helps soothe the sting of not being able to attend and see one of my quilts hang in such a prestigious show.

Wednesday 3 August 2011

Good Golly, Miss Polly

Polly has finally given her approval for the new layout of "our" string quilt.
You may recall from a previous post that I had chosen a barn raising setting for the blocks...
...but Polly didn't think much of that.
She likes the new arrangement much better. Polly sits patiently beside the sewing machine and watches carefully to make sure I sew the blocks in the correct order. (Hasn't she grown?)
I pieced, starched and pressed the red backing and taped it to the floor to start the quilt basting. I got called away to the phone.
Apparently that mouse showed up while I was gone.
And Polly was called upon to save the day once more.Once more I starched, pressed and taped the quilt backing to the floor. It's rather like having a terrible 2's toddler in the house.
"From the early early morning till the early early night, You can see Miss Polly rockin'..."