It was also exciting to see three crocuses in bloom in the garden. Double yay!
I hope I don`t wake tomorrow to learn these are April`s Fool pranks :)

Sew Karen-ly Created: Original designs for today's busy quilters
 She took a break from it this winter to do this Oriental. Of this mat Kate writes, The Oriental is called "Double Happiness" because that is what the grouping of 2 characters at each end of the rug mean. I was at loose ends deciding what to do in the purple columns because I had hooked in a number of things and taken them out because I didn't like them. Knowing how complex Chinese characters are, I decided to see if numbers were any easier. They are! The characters down the left side and up the right side read 6 1 2 4 9 - my birth date.
 Beautiful work. Thanks so much for sharing these pictures, Kate - now...get hooking: we want to see the New York Roundabout finished! :)
 Here is (NY) Roundabout Again. If it looks a bit familiar to you, there's good reason. It's a new and improved version of the popular New York Roundabout pattern. The block is smaller and has been redrawn to fix some of the awkwardness inherent in the first design. It has a smoother overall flow and is a more practical size. It measures 31" x 50", so is a terrific size for a wall hanging or a table topper. As we learned in previous posts, as copyright holder I am within my Rights to present a derivative copy of the original design. I purposely used dramatic colours so the lines of the design would show clearly, which they most certainly do.
 Hubby and I took it downtown to be photographed in Amherst's new bandstand in the recently renovated Victoria Square. You can see by the snow that this was awhile back - February, I believe. It takes awhile for things to come together.

 After reworking the design, the pattern and instructions needed to be verified and two professional quilt testers stepped up to help. Here is the one made by Mavis Shanks from Howell, Mi. Mavis used Northcott's "Stonehenge" line to piece her Beauty.
 Mavis works as a longarm quilter, so it was really interesting to see the designs she chose to quilt. I love that motif in the centre - beautiful work.
 This lovely version was made by Darlene Gerber from Geneva, Ohio. Darlene has a blog where she shows her work, as well as more pieces which she has tested for other designers.
 I was happy to learn that neither Mavis nor Darlene encountered any issues in making Roundabout Again, and feel confident that the pattern is ready to release. As usual, Polly was involved every step of the way. Here you see her checking the area for stray chickens or mice as we prepare for the photo shoot.
 Roundabout Again has been added to the Pattern page of my website, where you can order your copy online.
 I am really happy with the way this piece turned out.
 This one is by Joan. Isn't it striking in red, black and white?
 Lorraine used the same combination for hers.
 The 3-D effect in Ruth 's is pretty amazing. It's really spinning. Great colour choices, Ruth!
 Tropical colours jazz up Liz's version.
 Doris chose soft flowery prints.
 Thanks to all for sharing the pictures. If you'd like to try your hand at a Fruit Smoothie, the pattern may be purchased on my website (#410).
 You have to love when real life gets cancelled...so much is accomplished. I cannot believe I am almost finished. We need more snow!!
 Are you the persnickety personality whose points project perfectly, and seams snuggle succinctly?
 Me too...to the best of my piecing ability. I also insist on changing my thread when seaming high contrast areas. There's really nothing worse than seeing dark thread shadow through a seam on light fabrics...or vice versa. In this picture (trimmed to an odd shape so you can focus on the seam), I started with a golden thread on the yellow fabric. I stitched to the seam, dropped my feed dogs and took 3 stitches to lock the threads. Then I changed to black thread, took 3 stitches with the feed dogs down then popped them up to continue sewing the seam.
 I am using black as even though there is a small area of red to cross, it quickly changes back to black. It would be nuts to change to red to sew only a dozen or or so stitches, but if that red section had been white, I would have done so. Small things like this contribute greatly to the overall look of the quilt and yet only add a few more minutes to the construction. When I joined the yellow centre to the red/black section below, I had golden thread in my bobbin and black in the top. The red thread you see along that seam line is my stay-stitching. Every time I have a curved seam, I do a row of stay-stitching about 1/8" from the edge on each layer of fabric. You cannot see it on the yellow below as the seam is pressed over but trust me, it's there. Our Home Economics teachers were right when they recommended stay-stitching for curves - it makes the edge of the fabric more stable and less likely to stretch into a wonky shape as you stitch. These blocks come out square and true, not needing trimming.How picky are you with your patchwork?

 In my December 20th post entitled Copy Cats, I included a link to an article on copyright as it applies to quilters written by Kathleen Bissett. You can read the article in its entirety here. With Ms. Bissett's permission, I will be quoting passages from this article in upcoming posts to illustrate some of the issues which hound me as a designer. Continuing on with the issue currently at hand, the Michigan quilt shop owner taught my New York Roundabout design at a well-known quilt retreat. In the widely distributed brochure, "her" beautiful quilt is given a position of prominence. Not only is it dead centre, it's the only workshop project pictured. And why is that? Because that quilt design is not only visually appealing, it is UNIQUE and sure to attract a good crowd of participants to the retreat who are tired of quilting the same old thing. Not only is the quilt pictured, but the owner is given a nice write-up on her quilting accomplishments. In her article, Ms. Bissett writes: "Since there was no reference to me or my pattern, the implication is that the artist is the designer." That's certainly the case here: everyone reading this brochure or attending the retreat believes that this shop owner designed this quilt herself including the retreat organizer; she was shocked when I contacted her to tell her otherwise.
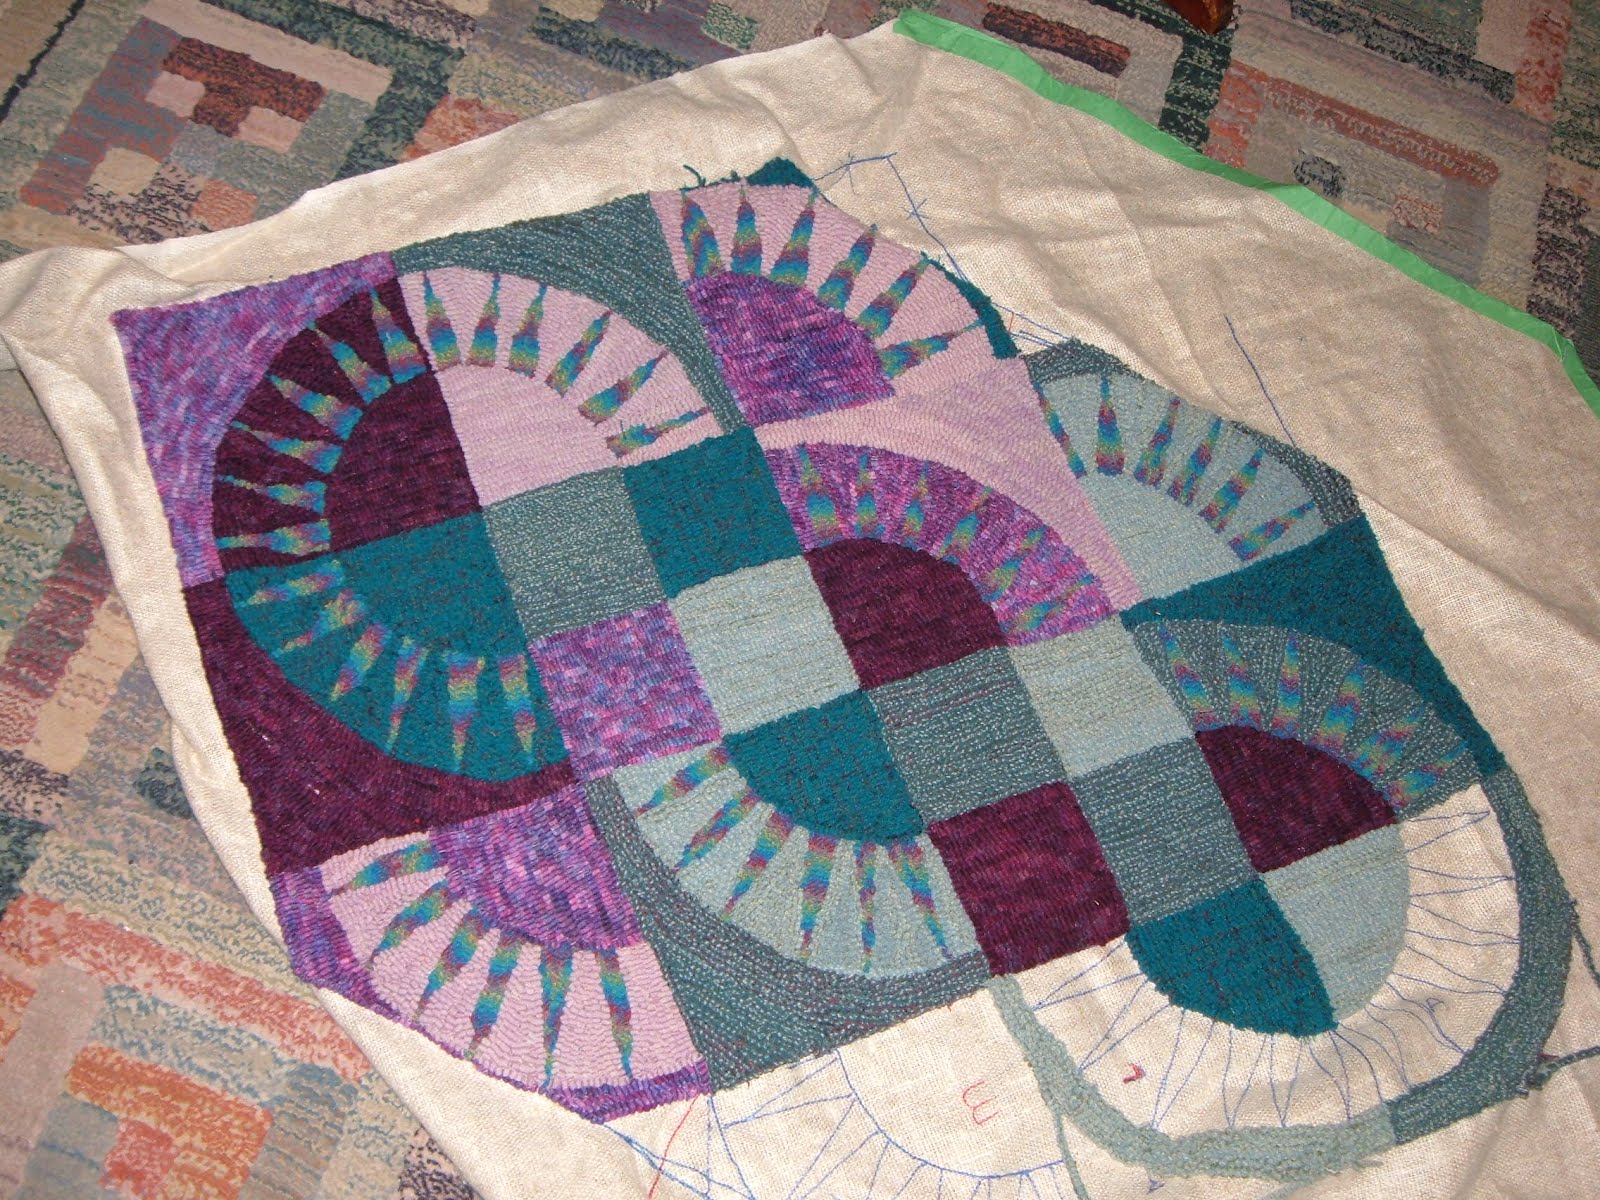
 ...and here is the beginning of Kate's mat.
 She drew it out full sized on the burlap base.
 Her palette of wool is similar to mine.
 This gorgeous rainbow is being used for the spikes in the New York Beauty block.
 Kate assures me she is a slow hooker and that it will be some time before her project is complete. I can't wait to see it!
 Here's a version made by Carmen in Minnesota; her addition of a little yellow for some of the background in the arcs adds a bit of warmth. Nice job!

 Earlier this week, I challenged readers to pick which was my block from this shot of the mug. Linda and Gail, two dedicated quilting bloggers, both emailed to say they knew exactly which one was mine so... ladies, did you get it right?!
 It's this one, plain and simple.
 If you know me at all, you know I operate on the KISS principle. My favourite quote, attributed to Albert Einstein, is "Make everything as simple as possible, but no simpler." And that's exactly how this block was born. Essentially, I started with a square and added a narrow sashing with angled ends. It was fine but Albert would have viewed it as too simple. So I split the centre square into an HST and it was immediately better. I could place blocks side by side to get this...and thus the name Hidden Stars was born.
 Placing the blocks on point was even more fun:
 Here are some layouts you get when rotating the block:


 It's cool how the stars superimpose themselves over what's going on in the background with the HSTs.

 The good folks at Quiltmaker also liked the simplicity of the block and played around with their own layout. They decided to make a kit available with full instructions and yardage to complete the quilt shown below. You can check out the details here:
 For those of you who have the block instructions from the magazine, here's a simple runner you can make using large florals and only three blocks. Finished, it will measure 12-3/4" x 25-1/2". Simply follow the instructions for the block, tripling the yardage given for the materials. I like how that centre star cinches the middle section together, almost like a tiny waist or a bow on a package.
 Of course, you can also do it full sized and add a funky pointy border as well.
 There's no limit to where simple can take you. If you'd like to win a copy of the magazine, leave a comment at the bottom of this post by midnight tonight (Friday), AST (Atlantic Standard Time) saying where you are from. Please make sure that your email address is included so I can contact you; send it to me here in addition to the comment if you are unsure.
 One of the projects featured is my Fandango quilt, which I have shown snippets of here while it was in progress. Now I am pleased to be able to show the whole thing. It is pictured here spread out on my great-grandmother Christina Patterson's treadle machine.
 The soft palette chosen for the old-fashioned fan blocks are from Benartex's Forever Spring collection, designed by Nancy Halvorson. The fans are set together in diagonal pairs to form butterfly wings.
 I love sewing curves, and my little secret to keeping the blocks true is to pin not just along the curve where you stitch, but also at each end to keep the background piece square to the edge of the blades. I use this method to sew my New York Beauty blocks as well and find that they come out (dare I say it?) perfect each time. You will notice a row of stay-stitching on the lower curve, and that's another little trick to keep your curves smooth. The top curved edge of the fan blades (under those pins) has also been stay-stitched before this background piece was added, about 1/8" from the edge.
 After the centres and background sections are added to the fans, each block is numbered and lettered to show the final placement in the quilt.
 The butterfly bodies which are added by appliqué are simple to make, using freezer paper and starch to turn under the edges.
 They are sewn to the quilt using invisible thread and a blind hem stitch. Fast and easy!
 Basting is never fast and easy, as I spread the quilt on the floor and use safety pins. Masking tape holds all the edges taut and smooth before I begin pinning. The salvation for this chore is music, which needs to be loud enough to drown out my singing while I work...!
 When I move the quilt onto the machine, the first part of the quilting is with the walking foot on. I outline all of the blocks and patches which form the design. We often hear that our work should look as neat on the back as on the front, and this applies to machine quilting as well. Outlining the patches makes the design discernible from the back, which it otherwise would not be if the quilting were only done to highlight various areas on the front.
 Once the quilt is secured with this outline stitching, the safety pins are removed and the fun begins.
 Without the quilting, these are merely fan blocks with an oval appliquéd between. Much as a butterfly emerges from a cocoon, these fan blocks morph into butterflies with the help of thread.

 I wanted the quilting to be soft and light and springy so I chose curlicues to give a filigree look.
 Antennae were stitched at the end of each butterfly.

 A scalloped border of fan blades was added to the outer edge. Using a triangle at the corners made for easy turning...and binding.
 Heather MacArthur added a bonus tutorial in the magazine with instruction on how to make bias binding.