It's taken awhile to decide how to finish up the Global Warming quilt. At 80" x 80", it's too large to be a wall quilt, so it's destined to be used on a bed. Lots of folks tell me they prefer square quilts, but I don't. A bed is rectangular, so for a quilt to cover it properly, it needs to be rectangular too...right? This is one area where I think we should do what suits our purposes instead of sticking to a size set by a chart found on the internet.
 My grandmother's beautiful quilts are all too short on our beds; Gram didn't like the quilt to come up over the pillows. I do. But I also don't like the quilt dragging on the floor at the sides, so to make this one work, I am only adding borders to the top and bottom of the quilt.
Next was to decide what the border should be - plain? circles to echo the central one? stars for a sky? Hmmm...lots of options. I didn't want anything too cute, as this quilt will have a male owner. In the end, I decided on triangles, to complement the geometric squares and circles of the centre. They were cut from leftover fabrics used in the body of the quilt.

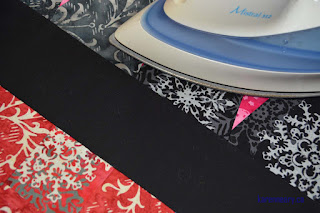
 I added a 3" plain black strip before the pieced border, just to separate the patterns. You can't see this in the black, but my method for joining the plain strips for length differs from the way most around here do it. I butt the short ends together and sew a straight seam. I press this seam open, and centre it on the quilt top. (If this were a print fabric, I would match the pattern.) The joining seam disappears into the quilt. I never understand why folks use a diagonal seam to join a border strip, and then place it off-centre on the top. It sticks out like a sore thumb. :)
 The pressing is done with a hot, dry iron, and you can see how nicely the fabrics have joined - no puckers in the seams.
The quilt top now measures 103-1/2" x 80" -longer than it needs to be, but it will take up a bit in the quilting, and all will be well...after the dreaded basting is done, that is...

Next was to decide what the border should be - plain? circles to echo the central one? stars for a sky? Hmmm...lots of options. I didn't want anything too cute, as this quilt will have a male owner. In the end, I decided on triangles, to complement the geometric squares and circles of the centre. They were cut from leftover fabrics used in the body of the quilt.

I sewed the triangles together in two long strips, and gave them a good spritzing with homemade starch. I also starched and pressed the quilt top well. You can't see it in this shot, but there is stay-stitching around the perimeter of the pieced top, 1/8" away from the edge. The stitching and the starching make a big difference in having a nice, smooth border seam.


I like that border, with triangles, very fitting, and for the border seams, that does look great, I will try it next time I need to add one.
ReplyDeleteThat is getting even more fabulous......I have tried joining straight and joining bias, and how it looks depends on the fabric.
ReplyDeleteI think your border will be fabulous Karen. Can't wait to see a final shot. It's a beauty!
ReplyDeletePerfect solution! It's been a long time since I've made a quilt that large! Looking forward to the final finish!
ReplyDeleteOnce again, it's a treat to see your process. That is one BIG quilt. Good luck to you (and Polly) with the basting.
ReplyDeleteI'm with you on straight seams for joining strips. Sometimes I do it for joining binding strips depending on the look I want. Basting a large quilt is the worst part. What a gorgeous quilt this will be.
ReplyDelete