Sew Karen-ly Created...

If you have arrived here via a link (such as to a tutorial) click on "Sew Karen-ly Created" to return to the latest blog post. I invite you to my website to see a gallery of quilts and patterns available for purchase.
Comments are always appreciated, simply click the word "comments" at the end of each post to leave your message. Thanks for stopping by!

Friday, 25 May 2018

Mat Inspiration

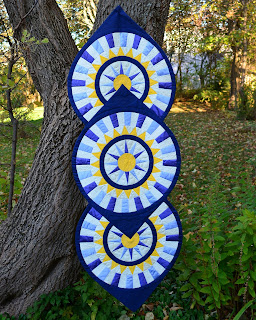
This optical illusion quilt, designed by Ukrainian quilter Mezhibovskaya Valery Vadimovna, aka lerusisik, has garnered lots of attention, both here and where it currently hangs at Mrs Pugsley's Emporium.
One of the folks intrigued by this quilt entitled "Through The Lens"  is rug hooker Kate Seely from Ontario.  Kate and I enjoyed a conversation on the mechanics of drawing out the design, and she very quickly produced this mat.  Isn't it wonderful?
Her colourful version replaces stark black with a dark green, and uses multi-coloured centres for the blocks.  Believe it or not, the dark green was from a wool kilt which she washed, felted, and then cut into strips.  I don't believe I could ever bring myself to cut up a kilt!!
I was very surprised to get these pictures so soon after she contacted me, but she had an intense five day hooking marathon and went to it.  Kate will eventually add border rows and promises to share pictures of the completed piece.  I think it looks fabulous!
This is not the first time Kate and I have connected over mats and quilts.  A few years back, she wrote for permission to hook my New York Roundabout:
She amassed a palette of wool in similar colours...
..and sketched her design on burlap.


How awesome is this?!
Really love your work, Kate, and so appreciate you sharing pictures.  Can't wait to see your optical illusion all finished!
K8 the Gr8 :)

Wednesday, 23 May 2018

Quilt Show/Thread Orders


If you are attending the Thistle Quilt Show on Saturday and looking for Aurifil thread, you can order from my website for free delivery to the show. Beth has kindly offered to take any orders with her for pickup at Mrs Pugsley's Emporium Inc pop-up shop. The thread will NOT be available for purchase at the show. Simply place your order online and mark it “pick up at Thistle show”. If you are accidentally charged shipping, it will immediately be refunded to you. There are lots of gorgeous colours in stock, as well as fabulous collections:


All prices shown on the website INCLUDE taxes, nothing more will be added. The orders must be received by midnight tonight- Wednesday, May 23, 2018 - to ensure it’s ready to go with Mrs P's to the show. 

The Thistle Quilt Guild members have been working hard and have a lot of beautiful quilts entered in this show. You will be impressed with their workmanship!

Thursday, 17 May 2018

Facing A Quilt

Facing a quilt is way less terrifying than the ominous-sounding "facing the music" (a phrase, which frankly, I've never understood.  If I paid for concert tickets, I would not be very happy to NOT be facing the music! :))  Adding a facing is similar to a binding, except unlike a binding, it does not show.  It flips out of sight to the back of the quilt.  It's a nice finishing technique to use when you want a clean, crisp edge on your quilt. I used it on this "Tempus Fugit" quilt featured in my book "Quilting Beauties" as I felt a binding would add a distracting edge.
A facing is particularly nice on a modern quilt, adding to the minimalist look.  I usually cut my facing strips 2 - 2-1/4" wide (sometimes narrower, depending on the project.  Tempus Fugit above was pieced from silk, and I used a 1" wide facing, cut on the bias to hug the curves.) For my current project in cotton, I cut the strips 2-1/4" wide across the straight of grain.  The strips are sewn to the sides of your quilt first, and they are cut the length of the quilt measured through the middle.  1/4" is pressed to the wrong side along one long edge of the strip, and the other edge is stitched to the front of the quilt.
The facing is flipped out and gently nudged into place with an iron.  Hard to tell from the picture, but I do not touch the iron to my quilt, but rather just have it hover above the seam for some gentle heat to encourage the facing to lay flat.
The real trick is the understitching, which is done through the facing and the seam allowance, about an 1/8 of an inch away from the seam. If you are a garment sewer, you will know this technique from collars and arm hole facings. After the understitching is added, the facing turns easily to the back.
The understitching will show on the back of your quilt, so it's important to match your thread colour.  It is sewn in place with hand stitches along the length before the top and bottom facings are added.
The top and bottom facings are cut about an inch or so longer than the width of the quilt.  This allows a little turn in for the raw end.  It is stitched on as for the side facings.


 The top and bottom facings fold in on top of the side facings, with the raw end tucked neatly inside.
 It gives a clean, uncluttered finish to the front of the quilt.
Some folks sew a mitered corner through their facings before turning them to the back, but the advantage of sewing them square like this, is that you can slide a skinny rod through the opening at the end of the facing and not have to add a separate hanging sleeve.  That means, less work, less bulk.
Have you ever faced a quilt?


Monday, 14 May 2018

Island Batik April re-cap

Every month, Joan from Moosetash Quilting, does a recap of the Island Batik Ambassador projects for the latest challenge.  You can check out her recap here.  It's so fun to see how different each project is!

All of the Ambassadors for 2018 are linked at this post.  Enjoy!


Friday, 4 May 2018

Island Batik May Challenge: Playful Pillows

This month's challenge for Island Batik Ambassadors was a whole bunch of fun: Playful Pillows!
The products featured in this post were given to me by Island Batik.
We were encouraged to "not be afraid to think outside the pillow form - pillows don’t have to be square!" Upon reading this, I knew exactly what I wanted to make! A couple of years ago as a Christmas present joke, I made my eldest son a pillow in the shape of a fish (he plays in a band called "Moon Trout"). At the time, I was stitching samples for an upcoming class I was teaching on curved piecing, so incorporated that technique into the body of the fish. It was a huge hit I decided to make another fish pillow, but this time it would be a rainbow trout. I chose bright colours from my box of Island Batiks: most from the "foundations" and "stashbuilder" bundles, but also a sunny yellow left over from last month's Sun Salutation quilt.

I made two sections of patchwork - one for the front and one for the back - and layered them with scraps of my favourite Hobb's wool batting.
The quilting was done with a variety of weights and colours of Aurifil thread, as well as a holographic thread to add a little iridescence.


Typical for me, I hadn't used a pattern for my original trout, but rather checked some images on Google and just winged it, drawing out a shape on paper. I never thought to save my paper pattern, but fortunately I had quilted an extra body and head piece and located those in a box. (Like a quilter would throw out a piece of fabric?!? :))
 I laid the shape on my patchwork and cut them out.

I really liked this tie-dyed batik, and it picked up all the colours from the body, so I quilted it with "gills" and planned to use it for the head. 
However...it seemed a little quiet when added to the stripes.
So I quilted a piece of turquoise and liked it much better.  Fins are added from purple, green and orange...
 ...and the tail looked great with a slightly darker shade of turquoise than the head.
Here he is all together, and ready for stuffing with polyester fibrefill.
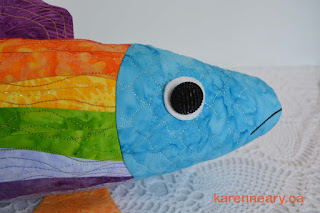
For my original trout, I used a shiny black button, and luckily had similar buttons on hand, but in a slighter larger size. (See that silver crescent appliquéd on the top face?  That's how you know it's a moon trout :))
I cut out a circle of white felt to add under the button to help make it stand out.  The thread spool was the perfect size!
 The mouth is added with narrow satin stitching, in black.
 Here he is in all his glory:
 Isn't he a handsome fellow?
Nose to tail, he measures about 26" long...which I am led to understand is a pretty good sized catch for a Rainbow Trout (they're normally around 16"). 
 Thank you, Island Batik, for presenting a fun challenge!